1297 words
6 minutes
36 第一个GUI

参考
https://boson.v2mcdev.com/gui/firstgui.html
第一个GUI
这次我们将自定义一个GUI,GUI就是用户界面,GUI的操作应该在客户端执行。
与GUI有关的类是Screen,如果要创建一个GUI,就需要继承Screen类,Screen类有两个重要的方法init和render我们会使用这两个方法,
其中init是初始化GUI的组件的,例如GUI上的按钮,输入框,等等。
对于输入框,按钮这样的东西是一个交互对象,这样的交互对象一般是Widget类的子类,所以我们先介绍以下有关的子类,大家了解下,如果用到了就到对于的子类下去看怎么做,毕竟这里也不会把所有的子类都讲一遍。
- AbstractWidget (net.minecraft.client.gui.components):Minecraft中所有GUI组件的抽象基类,定义了组件的基本属性和方法。
- AbstractScrollWidget (net.minecraft.client.gui.components):继承自AbstractWidget,表示可滚动的GUI组件的抽象基类。
- ImageWidget (net.minecraft.client.gui.components):继承自AbstractWidget,表示显示图像的GUI组件。
- AbstractSliderButton (net.minecraft.client.gui.components):继承自AbstractWidget,表示滑块按钮的抽象基类。
- TabButton (net.minecraft.client.gui.components):继承自AbstractWidget,表示选项卡按钮的GUI组件。
- PlayerSkinWidget (net.minecraft.client.gui.components):继承自AbstractWidget,表示显示玩家皮肤的GUI组件。
- LoadingDotsWidget (net.minecraft.client.gui.components):继承自AbstractWidget,表示加载时显示的动画点的GUI组件。
- AbstractContainerWidget (net.minecraft.client.gui.components):继承自AbstractWidget,表示容器类GUI组件的抽象基类。
- OverlayRecipeButton in OverlayRecipeComponent (net.minecraft.client.gui.screens.recipebook):表示在配方书界面中显示叠加配方按钮的GUI组件。
- AbstractButton (net.minecraft.client.gui.components):继承自AbstractWidget,表示按钮的抽象基类。
- GameModeSlot in GameModeSwitcherScreen (net.minecraft.client.gui.screens.debug):表示在游戏模式切换界面中显示游戏模式槽的GUI组件。
- AbstractStringWidget (net.minecraft.client.gui.components):继承自AbstractWidget,表示显示字符串的GUI组件的抽象基类。
- StateSwitchingButton (net.minecraft.client.gui.components):继承自AbstractButton,表示状态切换按钮的GUI组件。
- EditBox (net.minecraft.client.gui.components):继承自AbstractStringWidget,表示文本编辑框的GUI组件。
- RecipeButton (net.minecraft.client.gui.screens.recipebook):继承自AbstractButton,表示在配方书界面中显示配方按钮的GUI组件。
这里我们创建一个滑块的和一个按钮和一个输入框的GUI界面,并且使用一个Item打开这个界面,注意只能在Client端打开。
// 我们的GUI应该继承Screen类
public class FirstGui extends Screen {
    // EditBox类是输入框AbstractWidget的子类
    EditBox editBox;
    // button是按钮
    Button button;
    // 我们的GUI界面的背景图片的位置
    ResourceLocation FIRST_GUI_TEXTURE = new ResourceLocation(ExampleMod.MODID, "textures/gui/first_gui.png");
    // 这里的content是我们用于渲染文字的内容
    Component content = Component.translatable("gui." + ExampleMod.MODID + ".first_gui_title");
    // 滑条,参考调节音量那个
    ExtendedSlider sliderBar;
    // 构造,这个传入了一个titile不过没有使用
    public FirstGui(Component pTitle) {
        super(pTitle);
    }
/**
初始化GUI中的各个组件
*/
    @Override
    protected void init() {
        // 创建一个输入框,并设置其位置、大小以及默认文本
        // x,y,width,height,component
        this.editBox = new EditBox(this.font, this.width / 2 - 100, 66, 200, 20, Component.translatable("gui." + ExampleMod.MODID + ".first_gui"));
        this.addWidget(this.editBox);
        // button的应该通过builder获得,其中的起一个参数是按钮的名称,第二个参数是按钮按下之后会有什么操作的回调函数。
        // pos是设置按钮的位置
        // size是按钮的大小
        this.button = new Button.Builder(Component.translatable("gui." + ExampleMod.MODID + ".first_gui.save"), pButton -> {
        }).pos(this.width / 2 - 40, 96).size(80, 20).build();
        this.addWidget(this.button);
        // 滑条,位置x,y,宽高w,h,滑条名称前缀,后缀,滑条的最小值,最大值,初始值,是否渲染文字
        this.sliderBar = new ExtendedSlider(this.width / 2 - 100, 120, 200, 10, Component.translatable("gui." + ExampleMod.MODID + ".first_gui.slider"), Component.empty(), 0, 100, 0, true);
        this.addWidget(this.sliderBar);
        // 别忘记的调用super
        super.init();
    }

/**

渲染GUI界面

@param pGuiGraphics GUI图形对象

@param pMouseX 鼠标X坐标

@param pMouseY 鼠标Y坐标

@param pPartialTick 部分刻度
*/
    @Override
    public void render(GuiGraphics pGuiGraphics, int pMouseX, int pMouseY, float pPartialTick) {
        // 暂时搞明白是干嘛的
        this.renderBackground(pGuiGraphics, pMouseX, pMouseY, pPartialTick);
        // 设置渲染时候的色彩和透明度是正常的。
        pGuiGraphics.setColor(1, 1, 1, 1);
        // 背景图的宽高
        int textureWidth = 208;
        int textureHeight = 156;
        // 渲染背景图
        pGuiGraphics.blit(FIRST_GUI_TEXTURE, this.width / 2 - 150, 10, 0, 0, 300, 200, textureWidth, textureHeight);
        // 渲染字体类型,内容,位置,颜色,
        pGuiGraphics.drawCenteredString(this.font, content, this.width / 2 - 10, 30, 0xeb0505);
        // 渲染编辑框
        this.editBox.render(pGuiGraphics, pMouseX, pMouseY, pPartialTick);
        // 渲染 按钮
        this.button.render(pGuiGraphics, pMouseX, pMouseY, pPartialTick);
        // 渲染滑条
        this.sliderBar.render(pGuiGraphics, pMouseX, pMouseY, pPartialTick);
        // 别忘记了调用super
        super.render(pGuiGraphics, pMouseX, pMouseY, pPartialTick);
    }
}
一个辅助的类,用于打开Screen,不直接在调用的原因是可能导致有些在server下加载尽在客户端存在的代码(群友提到的,不过我并没有测试出来问题)
public class GuiOpenWrapper {
    public static void openFirstGui(){
        Minecraft.getInstance().setScreen(new FirstGui(Component.translatable("test")));
    }
}
物品类,已经没有好说的了,很简单,在客户端的逻辑中打开GUI。
public class OpenFirstGuiItem extends Item {
    public OpenFirstGuiItem() {
        super(new Properties());
    }

    @Override
    public InteractionResultHolder<ItemStack> use(Level pLevel, Player pPlayer, InteractionHand pUsedHand) {
        if(pLevel.isClientSide){
            GuiOpenWrapper.openFirstGui();
        }
        return super.use(pLevel, pPlayer, pUsedHand);
    }
}
好了,我们这里用boson的一张图说明以下方法中的参数的一些关系
pGuiGraphics.blit(FIRST_GUI_TEXTURE, this.width / 2 - 150, 10, 0, 0, 300, 200, textureWidth, textureHeight);参数签名如下
// 第一个图片位置,x,y开始坐标,u,v图片的中纹理的启示坐标, 绘制宽高,图片的宽高
void blit(
        ResourceLocation pAtlasLocation, int pX, int pY, float pUOffset, float pVOffset, int pWidth, int pHeight, int pTextureWidth, int pTextureHeight
    )
不同数值如下。 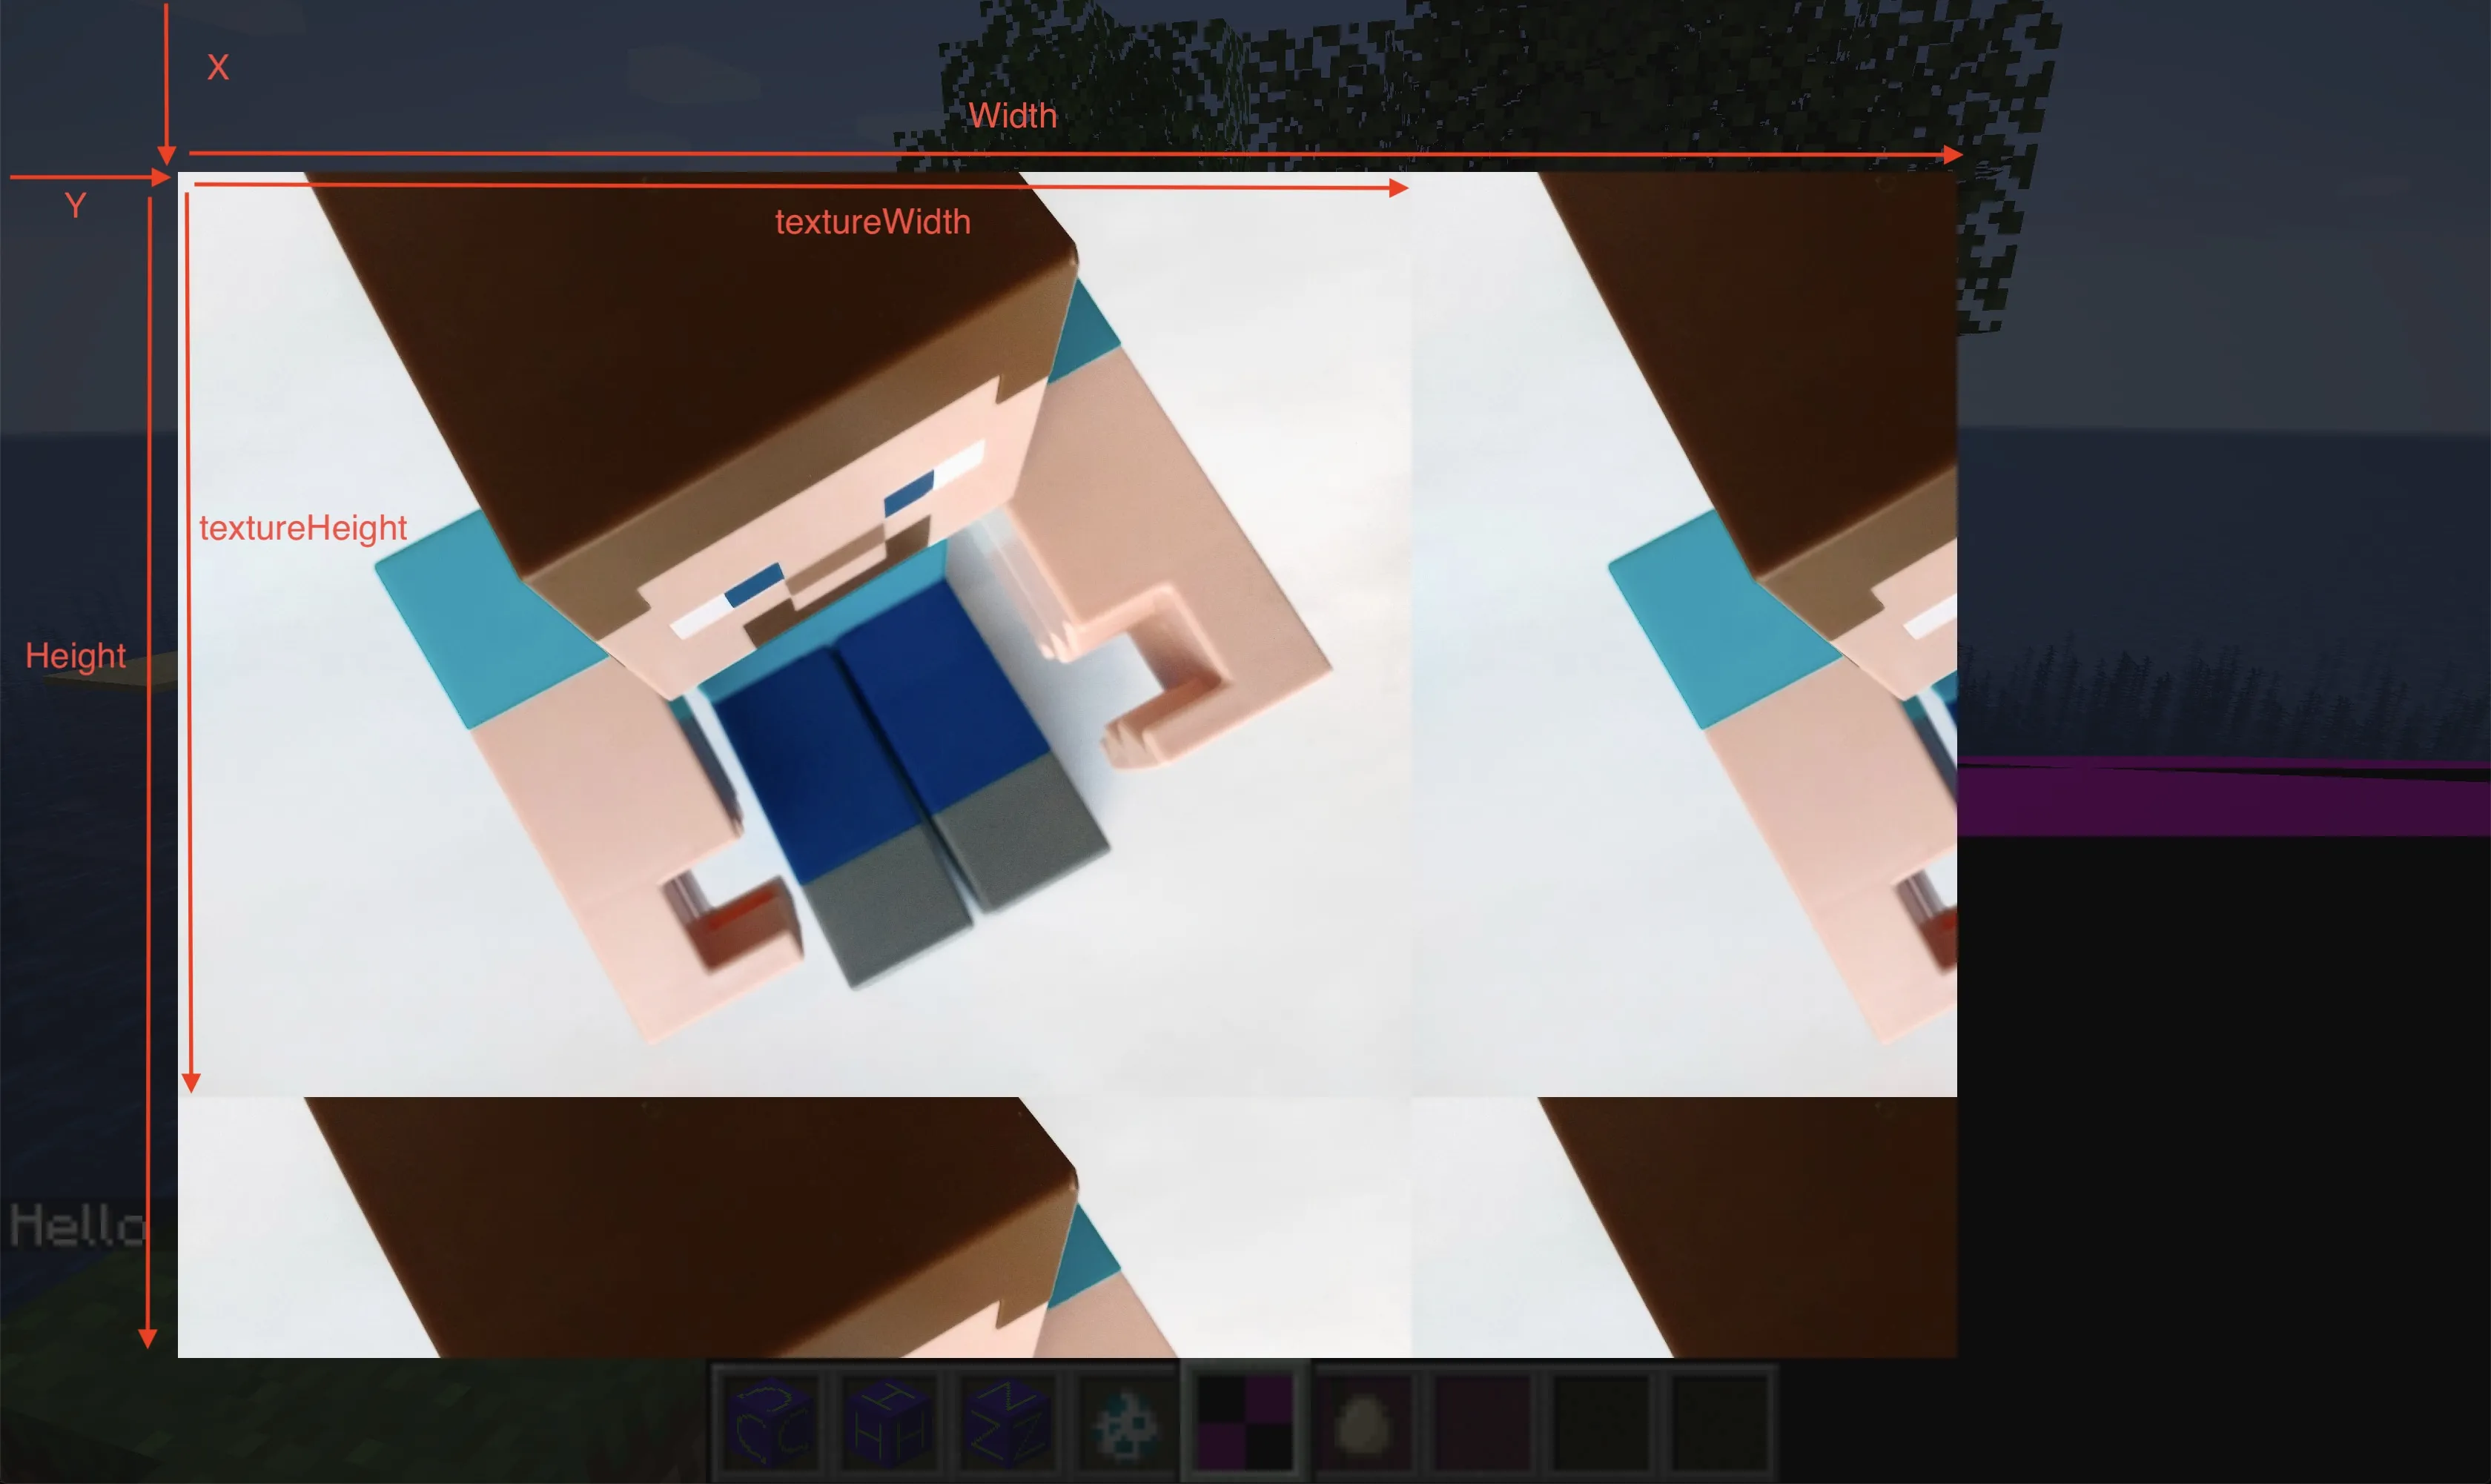
好了你可以进入游戏尝试打开了。